一、OpenLDAP安装

安装OpenLDAP如下:

apt-get update   
apt-get install slapd ldap-utils

安装过程中,会要求输入Administrator的密码,这个就是OpenLDAP的 admin 账号密码,记下备用,后面会用到。

二、配置OpenLDAP

这是最麻烦的部分,网上大部分教程都过时了。OpenLDAP在V2.4版本以后,默认已经不通过/etc/ldap/slapd.conf 文件来配置。/etc/ldap/slapd.d 是2.4.x版本新采用的配置文件目录,配置OpenLDAP最正确的姿势是通过ldapmodify命令执行一系列自己写好的ldif文件,而不要修改任何OpenLDAP装好的配置文件。

因为我们后面会使用LAM进行WEB管理,所以,在这时只要修改RootDN和Suffix就可以了。其它的配置交给后面的LAM就可以了。

要想修改RootDN,那么你就自己写这么一个ldif文件,假设给它起名叫RootDN.ldif,然后执行它就可以了:

dn: olcDatabase={1}mdb,cn=config
changetype: modify
replace: olcRootDN
olcRootDN: cn=admin,dc=lostend,dc=com
-
replace: olcSuffix
olcSuffix: dc=lostend,dc=com

怎么执行呢?

ldapmodify -Q -Y EXTERNAL -H ldapi:/// -f RootDN.ldif

这么长的命令是什么意思?-Q表示安静执行,-Y和后面的EXTERNAL表示,好吧,我也不知道什么意思,总之需要这样配合,然后-H表示地址,-f表示文件名。几乎所有的ldapmodify命令都这么执行就好了。

再来讲解一下上面的ldif文件的内容。dn表示你要修改什么东西,在这里我们用的是{1}mdb,你的系统不一定是{1}mdb,不管是几,总之你去查一下目录里的内容就好了:

ls /etc/openldap/slapd.d/cn=config/

得到的结果大概如下,不一样也不要害怕:

'cn=module{0}.ldif'  'cn=schema'  'cn=schema.ldif'  'olcBackend={0}mdb.ldif'  'olcDatabase={0}config.ldif'  'olcDatabase={-1}frontend.ldif'  'olcDatabase={1}mdb.ldif'

这里面有一大堆奇奇怪怪的数字,不要担心,其中有一个带什么db.ldif的就是你最终需要修改的数据库文件,我这里是mdb.ldif,你的可能是bdb.ldif,还有人是hdb.ldif,不管什么db,总之你要改的是一个叫db的文件就对了,你可以cat打开看一看,但是不要用vi去修改它。

changetype就是modify,表示我们要修改这个文件。第3行是replace,表示我们要替换里面的某个值,你可以把这个操作理解为mysql数据库的update操作,如果你把第3行改成add,那就是mysql的insert操作了。不过这里我们操作的只是配置文件本身,还牵涉不到添加用户或者更改用户,如果你以为事情就这么简单,那就是你太天真了。

RootDN在这里就表示你整个OpenLDAP系统的管理员用户名是什么,不要奇怪,后面这一砣都是用户名cn=admin,dc=lostend,dc=com,总之cn就是那个用户名字,后面带dc的都是域名。

这里的域名dc=lostend,dc=com ,可以填成你自己的。但是要记住。我们在配置LAM的时候会用到。好了,这里OpenLDAP自己的配置算完成了。

三、安装LDAP Account Manager (LAM)

进入下面网址,下载对应的安装包。这里用的是Debian,下载Debian package。
https://www.ldap-account-manager.org/lamcms/releases

下载完成以后,安装:

sudo dpkg -i ldap-account-manager_6.x-x_all.deb

安装的时候,可能会提示缺少依赖,把相关依赖装上就好了。

四、配置LDAP Account Manager (LAM)

因为LAM是基于WEB管理的,所以配置一个http服务端,LAM提供了apache和nginx的配置。我这里使用的是nginx。
以下是nginx的相关配置。

server {
    listen 80;
    listen [::]:80;

    server_name lostend.com;
    root /opt/lostend.com;
    index index.html index.htm index.php;

    include /etc/ldap-account-manager/nginx.conf;

    location / {
        try_files $uri $uri/ /index.php$is_args$args;
    }
}


/etc/ldap-account-manager/nginx.conf

这个文件是LAM提供的配置文件,在Debian 10里面,这个配置文件默认有所错误,需要打开此文件,把里面的

fastcgi_pass unix:/var/run/php/php7.0-fpm.sock;

改成

fastcgi_pass unix:/var/run/php/php7.3-fpm.sock;

重启nginx后就可以生效了。

然后打开 http://lostend.com/lam/ 就可以进行配置了。

具体LAM配置可以参照 https://blog.csdn.net/qq_21383435/article/details/83506675
只需要注意使用 dc=lostend,dc=com 替换相应的内容就可以了。在设置管理员的时候,填写 cn=admin,dc=lostend,dc=com 。

LAM 使用建议

1,登陆以后,建议进入一下初始化操作:
点击右上角的”Tools”-“Profile editor”。选中”Users”右边的编辑图标,将”RDN identifier”修改为uid。因为Users通常以uid作为识别码,而Groups通常以cn作为识别码。在这里也可以修改默认的用户目录等参数。

2,添加用户时,由于使用了 Unix (posixAccount)的类型(objectClass),所以”Common name”也必须填写,否则会报错。”Common name”和”User name”一样即可;

3,为用户修改密码时,”Set password”的小窗口关掉以后,还需要点一下页面上的”Save”,密码才会生效。
以前一段时间在openwrt上配置了autossh,手动启动它测试的时候一切正常。但是有一次openwrt重启了,autossh作为自动启动服务在开机启动时,老是在日志里报:

 user.info autossh[pid]: ssh exited with error status 1; restarting ssh

而且对端服务器一直报错:

sshd[pid]: Connection reset by [IP] port [port] [preauth]

就这样一直报错,连接不成功。但是手工重启一下autossh服务又一切正常了。一直比较奇怪。后来在
https://github.com/openwrt/packages/issues/5559
看到有朋友和我一样的问题,找到了原因所在。

autossh在开机启动的时候,找不到$HOME环境变量,默认从根目录下的.ssh中寻找known_hosts 文件进行主机认证。但是根目录下没有这个文件夹。就造成连接不成功了。所以,解决办法就在/etc/init.d/autossh 文件里手工把环境变量写进去。

export HOME=/root

这样,重启的时候就可以自动连接了。至于为什么启动的时候找不到这个环境变量,就没有深究了。

压缩

tar -zcvf /path/to/file.tar.gz file

解压

tar -zxvf /path/to/file.tar.gz /path/to

压缩加密

tar -zcvf - file | openssl aes-256-cbc -salt -k password -out /path/to/file.tar.gz

解密解压

openssl aes-256-cbc -d -k password -salt -in /path/to/file.tar.gz | tar zxvf -

上面的加密与解密操作在相同版本的openssl操作是没有问题的,但是在不同的版本(比如1.0.2和1.1.0版本之间)对于密钥和IV的生成方法有差异,所以在不同版本之间加密解密就会有问题。所以,在不同版本之间采用AES加解密的时候,需要使用参数支持指定密钥和IV,而不是让openssl自动生成,例子如下:

压缩加密

tar -zcvf - file | openssl aes-256-cbc -K 12345678901234567890 -iv 12345678 -out /path/to/file.tar.gz

解密解压

openssl aes-256-cbc -d -K 12345678901234567890 -iv 12345678 -in /path/to/file.tar.gz | tar zxvf -

在这里,注意AES算法的密钥和初始向量都是128位的,这里-K和-iv后的参数都是16进制表示的,最大长度为32。 即-iv 12345678 指定的初始向量在内存中为 | 12 34 56 78 12 34 56 78 00 00 00 00 00 00 00 00 |。

最近电信更新了系统,开通了ipv6的支持,路由拨号后,可能获得一个/60的前缀。这个时候参考网上的一些设置教程,大多是通过中继的设置就不太适合了。

可以获取dhcpv6-pd的情况下,在openwrt下设置其实非常简单:
1、WAN口设置好PPPOE后保持默认设置;

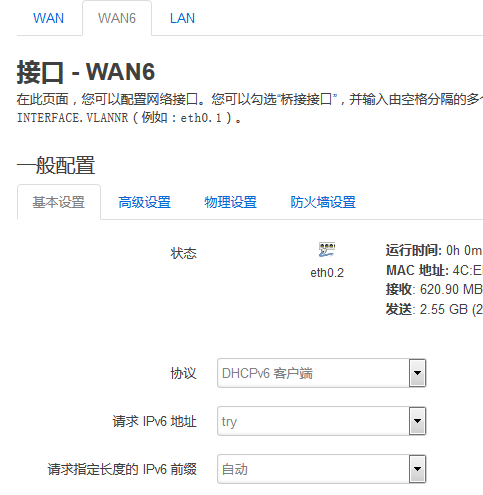
2、WNA6也保持默认设置,如图:
20181102101947.png

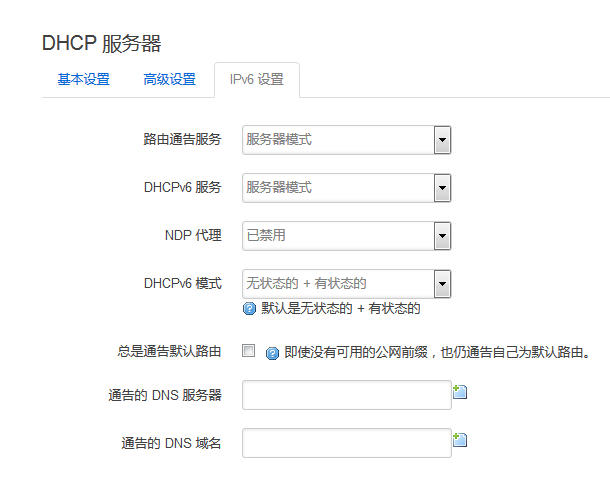
3、LAN口的IPV6设置为RA:服务器模式,DHCPv6:服务器模式,NDP:禁用,如下图:
20181102102240.png

4、最后检查 /etc/config/network 文件中的 config interface 'wan' 段下面:

option ipv6 'auto'

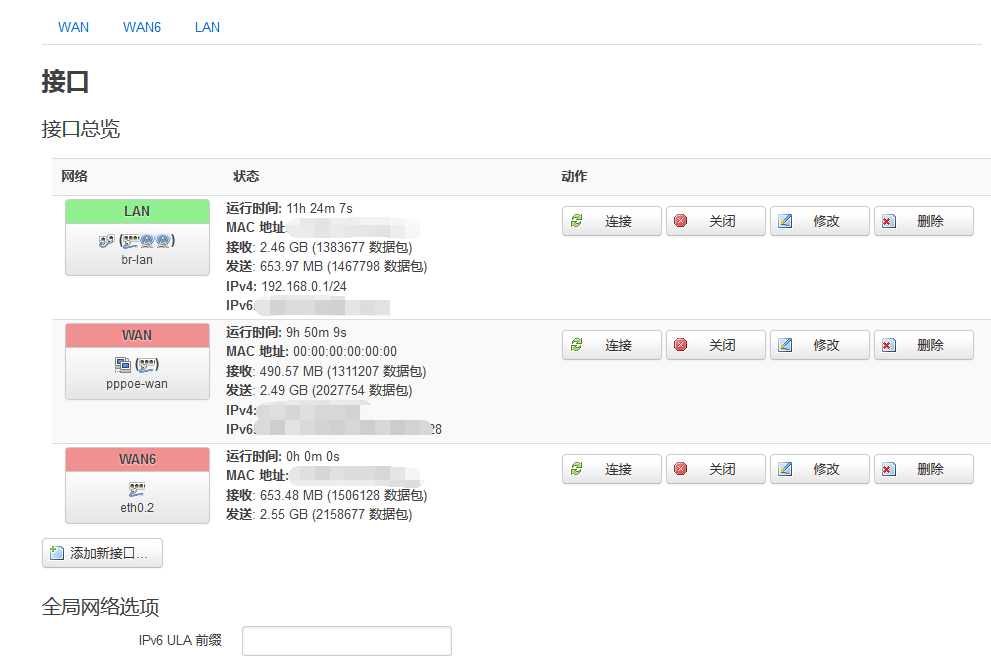
PS:如果上面设置还有问题,在接口界面把IPv6 ULA前缀设成空白:
20181102102830.png

这样就可以了,不用像网上教程说的那么麻烦的,很多教程基本上是为不能获得前缀的情况下准备的。

If you are debugging IPTables, it is handy to be able to trace the packets while it traverses the various chains. I was trying to find out why port forwarding from the external NIC to a virtual machine attached to a virtual bridge device was not working.

You need to perform the following preparations:

Load the (IPv4) netfilter log kernel module:

# modprobe nf_log_ipv4

Enable logging for the IPv4 (AF Family 2):

# sysctl net.netfilter.nf_log.2=nf_log_ipv4

reconfigure rsyslogd to log kernel messages (kern.*) to /var/log/messages:

# cat /etc/rsyslog.conf | grep -e "^kern"
kern.*;*.info;mail.none;authpriv.none;cron.none                /var/log/messages

restart rsyslogd:

# systemctl restart rsyslog

Now check the raw tables – you’ll see that there are already entries coming from firewalld:

# iptables -t raw -L
Chain PREROUTING (policy ACCEPT)
target prot opt source destination
PREROUTING_direct all -- anywhere anywhere

Chain OUTPUT (policy ACCEPT)
target prot opt source destination
OUTPUT_direct all -- anywhere anywhere

Chain OUTPUT_direct (1 references)
target prot opt source destination

Chain PREROUTING_direct (1 references)
target prot opt source destination

We’ll want to add our tracing rules before the existing rules. In this example we’ll trace everything related to HTTP (port 80)

# iptables -t raw -j TRACE -p tcp --dport 80 -I PREROUTING 1
# iptables -t raw -j TRACE -p tcp --dport 80 -I OUTPUT 1

The rules now look as follows:

# iptables -t raw -L
Chain PREROUTING (policy ACCEPT)
target prot opt source destination
TRACE tcp -- anywhere anywhere tcp dpt:http
PREROUTING_direct all -- anywhere anywhere

Chain OUTPUT (policy ACCEPT)
target prot opt source destination
TRACE tcp -- anywhere anywhere tcp dpt:http
OUTPUT_direct all -- anywhere anywhere

Chain OUTPUT_direct (1 references)
target prot opt source destination

Chain PREROUTING_direct (1 references)
target prot opt source destination

Now access to that specific machine’s TCP port 80 are logged to /var/log/messages:

# tail /var/log/messages
May 27 19:57:54 storm3 kernel: TRACE: mangle:PRE_public:rule:3 IN=em1 OUT= MAC=ec:f4:bb:f1:4e:f0:00:25:46:70:2e:41:08:00 SRC=10.36.7.11 DST=10.32.105.30 LEN=64 TOS=0x00 PREC=0x00 TTL=59 ID=10953 DF PROTO=TCP SPT=54451 DPT=80 SEQ=1779626624 ACK=0 WINDOW=65535 RES=0x00 SYN URGP=0 OPT (020404D8010303050101080A124E9DB70000000004020000)
May 27 19:57:54 storm3 kernel: TRACE: mangle:PRE_public_allow:return:1 IN=em1 OUT= MAC=ec:f4:bb:f1:4e:f0:00:25:46:70:2e:41:08:00 SRC=10.36.7.11 DST=10.32.105.30 LEN=64 TOS=0x00 PREC=0x00 TTL=59 ID=10953 DF PROTO=TCP SPT=54451 DPT=80 SEQ=1779626624 ACK=0 WINDOW=65535 RES=0x00 SYN URGP=0 OPT (020404D8010303050101080A124E9DB70000000004020000)
May 27 19:57:54 storm3 kernel: TRACE: mangle:PRE_public:return:4 IN=em1 OUT= MAC=ec:f4:bb:f1:4e:f0:00:25:46:70:2e:41:08:00 SRC=10.36.7.11 DST=10.32.105.30 LEN=64 TOS=0x00 PREC=0x00 TTL=59 ID=10953 DF PROTO=TCP SPT=54451 DPT=80 SEQ=1779626624 ACK=0 WINDOW=65535 RES=0x00 SYN URGP=0 OPT (020404D8010303050101080A124E9DB70000000004020000)
May 27 19:57:54 storm3 kernel: TRACE: mangle:PREROUTING:policy:4 IN=em1 OUT= MAC=ec:f4:bb:f1:4e:f0:00:25:46:70:2e:41:08:00 SRC=10.36.7.11 DST=10.32.105.30 LEN=64 TOS=0x00 PREC=0x00 TTL=59 ID=10953 DF PROTO=TCP SPT=54451 DPT=80 SEQ=1779626624 ACK=0 WINDOW=65535 RES=0x00 SYN URGP=0 OPT (020404D8010303050101080A124E9DB70000000004020000)
May 27 19:57:54 storm3 kernel: TRACE: nat:PREROUTING:rule:1 IN=em1 OUT= MAC=ec:f4:bb:f1:4e:f0:00:25:46:70:2e:41:08:00 SRC=10.36.7.11 DST=10.32.105.30 LEN=64 TOS=0x00 PREC=0x00 TTL=59 ID=10953 DF PROTO=TCP SPT=54451 DPT=80 SEQ=1779626624 ACK=0 WINDOW=65535 RES=0x00 SYN URGP=0 OPT (020404D8010303050101080A124E9DB70000000004020000)
May 27 19:57:54 storm3 kernel: TRACE: nat:PREROUTING_direct:rule:1 IN=em1 OUT= MAC=ec:f4:bb:f1:4e:f0:00:25:46:70:2e:41:08:00 SRC=10.36.7.11 DST=10.32.105.30 LEN=64 TOS=0x00 PREC=0x00 TTL=59 ID=10953 DF PROTO=TCP SPT=54451 DPT=80 SEQ=1779626624 ACK=0 WINDOW=65535 RES=0x00 SYN URGP=0 OPT (020404D8010303050101080A124E9DB70000000004020000)
May 27 19:57:54 storm3 kernel: TRACE: mangle:FORWARD:rule:1 IN=em1 OUT=virbr1 MAC=ec:f4:bb:f1:4e:f0:00:25:46:70:2e:41:08:00 SRC=10.36.7.11 DST=192.168.101.10 LEN=64 TOS=0x00 PREC=0x00 TTL=58 ID=10953 DF PROTO=TCP SPT=54451 DPT=80 SEQ=1779626624 ACK=0 WINDOW=65535 RES=0x00 SYN URGP=0 OPT (020404D8010303050101080A124E9DB70000000004020000)
May 27 19:57:54 storm3 kernel: TRACE: mangle:FORWARD_direct:return:1 IN=em1 OUT=virbr1 MAC=ec:f4:bb:f1:4e:f0:00:25:46:70:2e:41:08:00 SRC=10.36.7.11 DST=192.168.101.10 LEN=64 TOS=0x00 PREC=0x00 TTL=58 ID=10953 DF PROTO=TCP SPT=54451 DPT=80 SEQ=1779626624 ACK=0 WINDOW=65535 RES=0x00 SYN URGP=0 OPT (020404D8010303050101080A124E9DB70000000004020000)
May 27 19:57:54 storm3 kernel: TRACE: mangle:FORWARD:policy:2 IN=em1 OUT=virbr1 MAC=ec:f4:bb:f1:4e:f0:00:25:46:70:2e:41:08:00 SRC=10.36.7.11 DST=192.168.101.10 LEN=64 TOS=0x00 PREC=0x00 TTL=58 ID=10953 DF PROTO=TCP SPT=54451 DPT=80 SEQ=1779626624 ACK=0 WINDOW=65535 RES=0x00 SYN URGP=0 OPT (020404D8010303050101080A124E9DB70000000004020000)
May 27 19:57:54 storm3 kernel: TRACE: filter:FORWARD:rule:7 IN=em1 OUT=virbr1 MAC=ec:f4:bb:f1:4e:f0:00:25:46:70:2e:41:08:00 SRC=10.36.7.11 DST=192.168.101.10 LEN=64 TOS=0x00 PREC=0x00 TTL=58 ID=10953 DF PROTO=TCP SPT=54451 DPT=80 SEQ=1779626624 ACK=0 WINDOW=65535 RES=0x00 SYN URGP=0 OPT (020404D8010303050101080A124E9DB70000000004020000)